There's something magical about how to use a pour over coffee maker - it's like conducting a mini coffee symphony right in your kitchen.
The gentle stream of hot water, the rich aroma of blooming coffee, and that perfect first sip that makes your morning infinitely better. Whether you're new to the pour over world or looking to refine your technique, I'm here to guide you through every delicious step.
Think of pour over coffee as the sweet spot between science and art. It's where precision meets creativity, and where every small detail contributes to that perfect cup. Ready to dive into the world of pour over coffee?
Let's start with the basics and work our way up to becoming pour over pros.
How does a pour over coffee maker work?
A pour over coffee maker uses gravity and controlled water flow to extract flavor from coffee grounds, with water passing through a filter into your cup or carafe below. It's remarkably simple yet infinitely customizable, creating a mindful ritual that transforms ordinary beans into liquid gold coffee at home.
Let's break this down further. Unlike your standard pressed coffee maker, pour over brewing gives you complete control over every aspect of the extraction process. The magic happens when hot water comes in contact with the grounds - as it passes through, it extracts the complex flavors, oils, and aromas that make coffee so wonderful.
The key to great pour over coffee lies in its design. The cone shape creates the perfect environment for even extraction, while the filter ensures a clean, sediment-free cup. When compared to different types of coffee makers, pour over methods excel at highlighting the subtle flavor notes in your coffee beans.
How to use a pour over coffee maker (automatic)
Today's automatic pour over makers bring barista-level precision to your kitchen. While they might look intimidating at first, they're actually quite straightforward to use. Here's your step-by-step guide:
1. Fill the water reservoir
Start with filtered water at room temperature. The amount depends on how many cups you're brewing, but most machines have helpful measurement markers. Remember, water quality dramatically affects your coffee's taste.
2. Insert the filter
Place a paper filter in the brewing basket. Many automatic makers use special filters, but most accommodate standard cone filters. Pro tip: rinse the filter with hot water first to remove any paper taste.
3. Add your coffee grounds
Use medium-fine ground coffee, similar to table salt in texture. For optimal results, grind your beans just before brewing. Most automatic pour overs work best with about 2 tablespoons of coffee per 6 ounces of water.
4. Start the brew cycle
Press the start button and let the machine work its magic. Quality automatic pour overs will handle the coffee degassing and they know how to bloom coffee automatically.
Recommended automatic pour over coffee makers
- Technivorm Moccamaster A classic choice with excellent temperature control and a copper heating element. While reliable, it lacks Flask's easy cleanup system.
- OXO 8-Cup Brewer Good for beginners with simple controls and consistent results. However, doesn't match Flask's brew precision or elegance.
- Ratio Six Beautiful design but comes with a steep price tag. Lacks Flask's innovative features for preventing over-extraction.
- Breville Precision Brewer A tech-lover's dream with customizable brewing parameters. Though the digital display looks impressive, all those buttons and settings can be overwhelming when you just want your morning cup. And let's be honest - who needs six different flow rates when Flask nails the perfect one every time?
- Ninja Specialty Coffee Maker Sure, it makes decent coffee and has that fold-away frother that's fun to play with. But between the plastic-heavy construction and the complicated cleaning process, it's like they forgot that morning coffee shouldn't feel like solving a puzzle. Compare that to Flask's intuitive design, and well... you get the picture.
- Bonavita Connoisseur The minimalist's choice with one-touch operation. While it's refreshingly simple, the lack of features makes it feel a bit basic. Plus, the carafe design tends to dribble when pouring - definitely not ideal when you're still waiting for that first cup to kick in! Flask's drip-free pouring system saves both your coffee and your countertops.
How to use a manual pour over coffee maker
Let me take you on a journey into the world of manual pour over brewing - a ritual that's transformed my mornings from a sleepy scramble into a moment of zen. After countless cups (and I'll admit, a few memorable spills), I've perfected a method that turns making coffee into pure joy.
Think of manual pour over brewing as your morning meditation with a delicious reward at the end. Unlike automatic brewers that do all the work for you, this hands-on approach lets you control every variable of your brew. Trust me, once you nail these steps, you'll never look back!
1. Gather Your Tools
First things first - let's get everything ready for our coffee adventure! You'll need:
- Your favorite beans
- A reliable grinder
- Filtered water
- Scale (if you're feeling precise)
- Kettle (gooseneck preferred, but hey, I started with a regular one!)
- Your pour over setup
Pro tip: I like to line everything up like a coffee bartender. It makes the whole process smoother and, honestly, makes me feel pretty fancy!
2. Prep Your Workspace
This is where the magic begins! Clear your counter space and heat your water to that sweet spot between 195-205°F. I learned the hard way that skipping this prep step leads to a frantic dance of "where's my filter?" while your water gets too cold!
How to use a coffee dripper
Now comes the foundation of our coffee creation! Position your dripper atop your mug or carafe - it's like setting the stage for a tiny coffee concert. Fold the filter along its seams (those little lines are there for a reason!), and give it a good rinse with hot water. This step isn't just being fancy - it removes any papery taste and preheats your setup.
I'll never forget the time I skipped the filter rinse and wondered why my coffee tasted like cardboard. Learn from my mistakes, friends!
4. The Perfect Pour
Here's where we become coffee artists! Start with your bloom - that magical first pour where you just wet the grounds and watch them puff up like tiny coffee clouds. Then, begin your main pour in gentle, circular motions.
Remember my first attempt? I poured so aggressively, I created a coffee volcano! Now I know: slow and steady wins the pour over race.
5. The Finishing Touch
As the last drops filter through, give your coffee a gentle swirl. This helps the flavors settle and ensures an even extraction. Plus, it looks pretty cool - like you really know what you're doing (even if you're still learning, like I was for months!)
Let your coffee rest for about 30 seconds before serving. I know it's tempting to dive right in, but trust me on this one - those few moments make all the difference.
Each step builds on the last, creating a beautiful dance of coffee crafting. And remember, even if your first few attempts aren't perfect, you're still making coffee - and that's always a win in my book!
Recommended manual pour over coffee makers
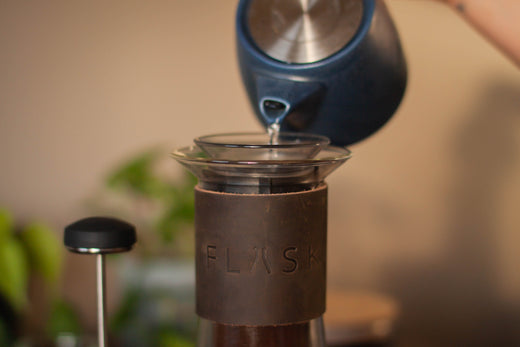
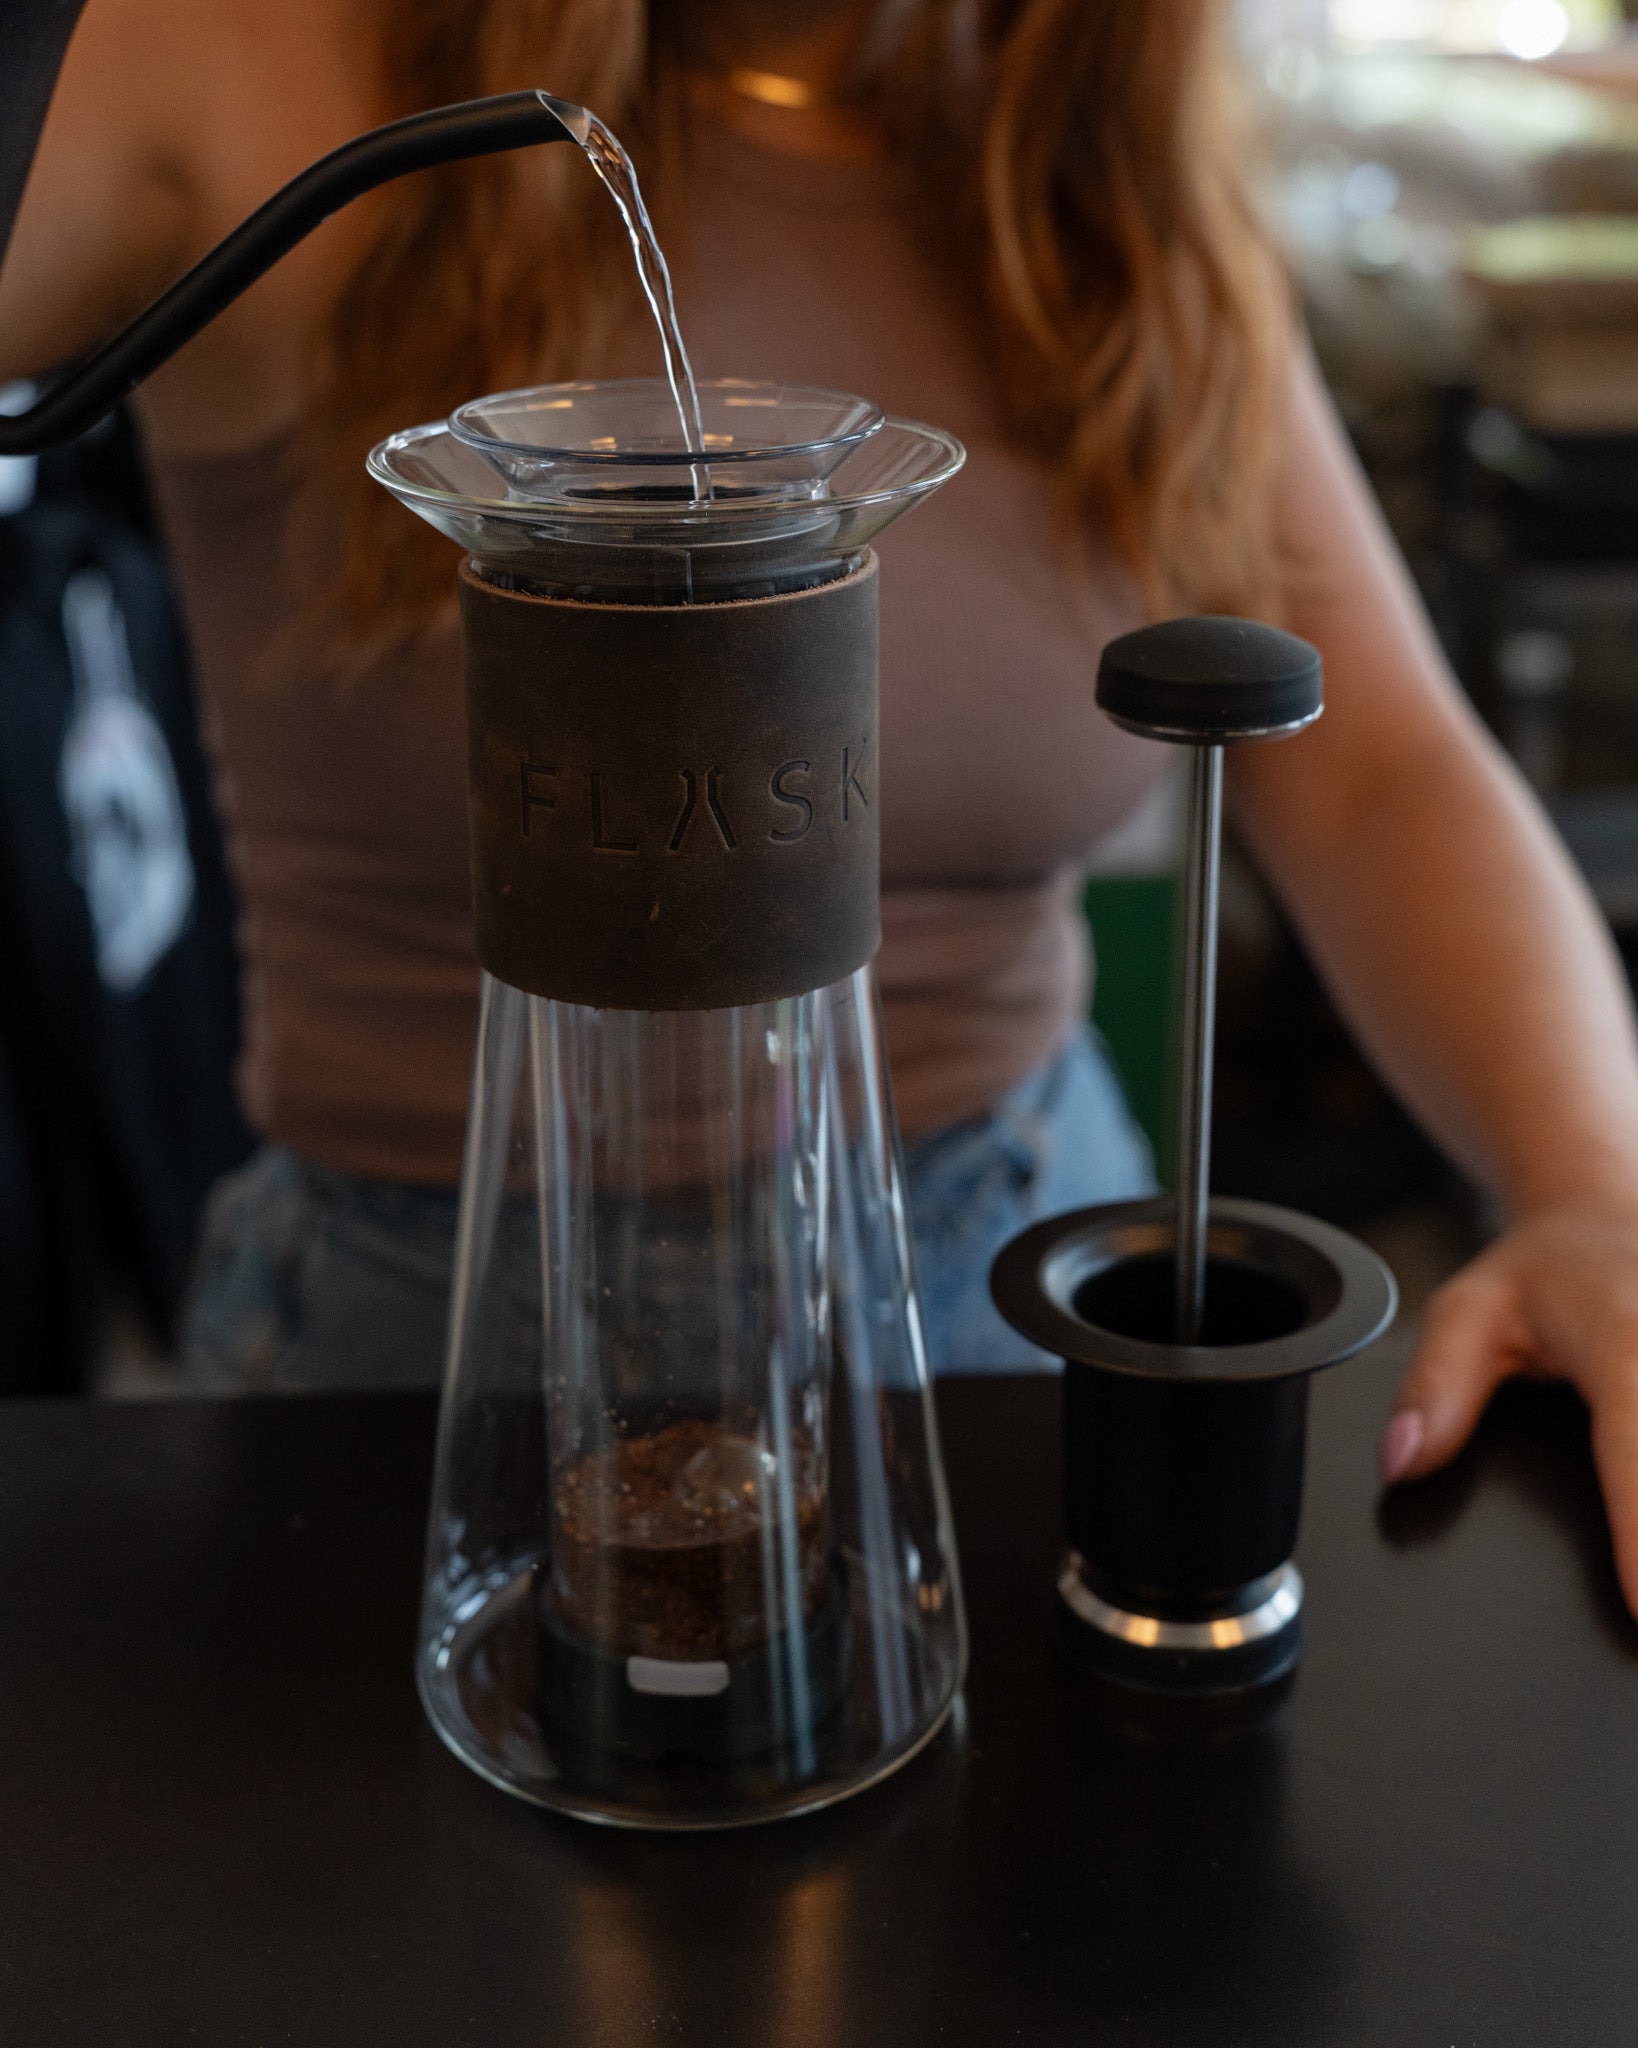
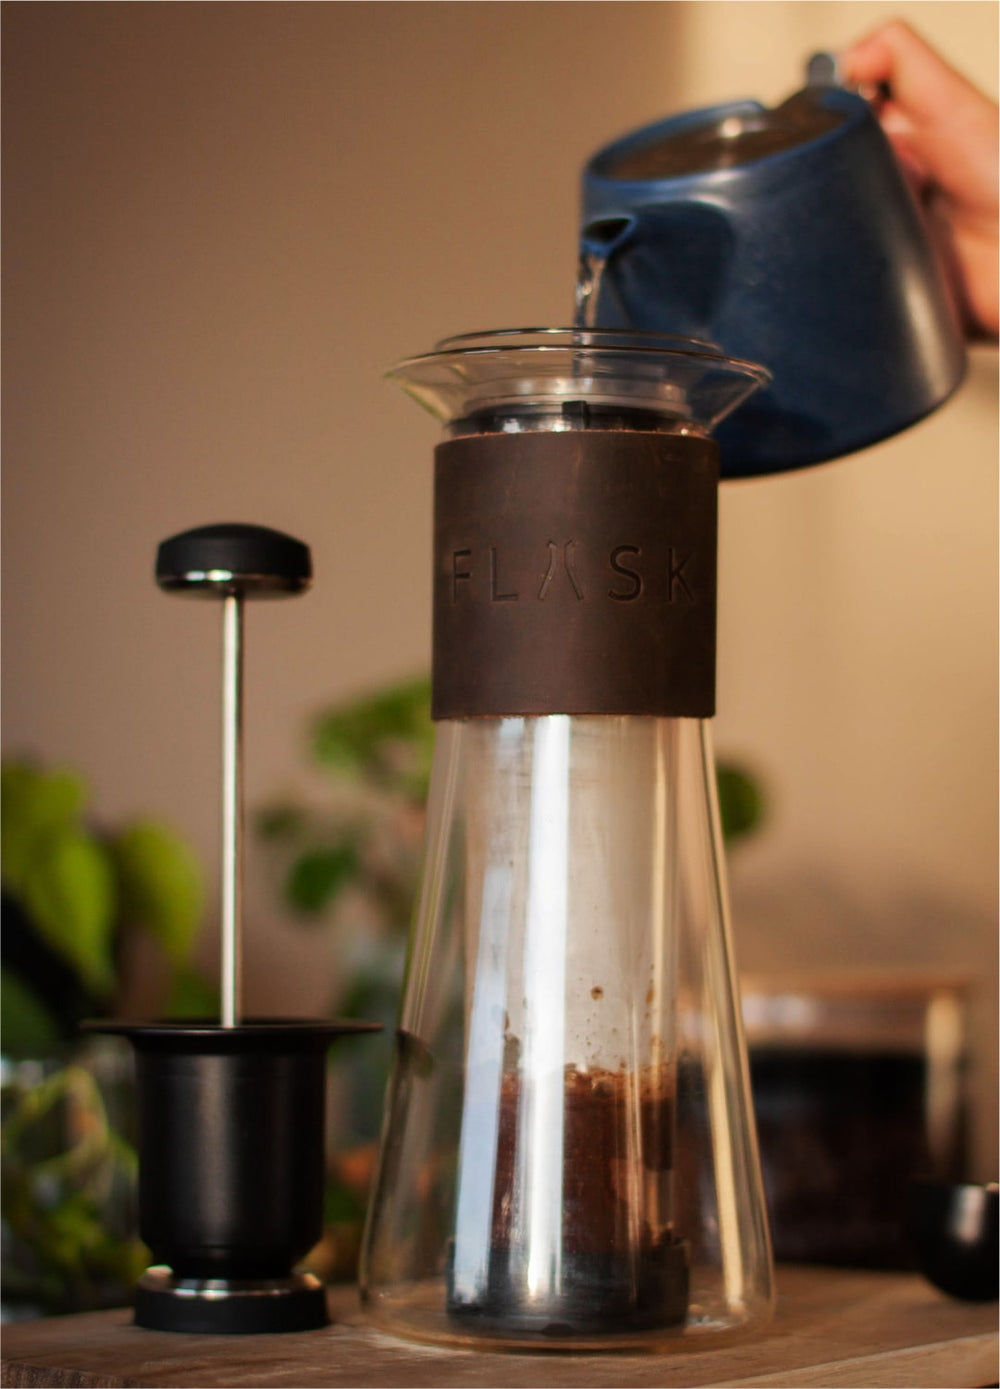
- Flask Manual Brewer The real game-changer in the world of manually brewed coffee. Its double-wall construction maintains perfect temperature while letting you watch the entire process. The cleanup is revolutionary - no more messy filters or grounds stuck in corners.
- Hario V60 A classic choice with its spiral ridges, but requires more technique mastery than Flask's intuitive design. Clean-up can be fussy.
- Chemex Beautiful to look at, but the thick filters can mute some subtle flavors. Doesn't offer Flask's temperature stability or easy cleaning.
- Kalita Wave Flat-bottom design for consistent extraction, though the small drainage holes can lead to overflow issues. Lacks Flask's innovative features.
- Fellow Stagg [X] Dripper Looks gorgeous on your counter with that matte black finish and precision-cut drainage holes. But here's the thing - those fancy holes can actually clog if your grind size isn't perfect. Flask's design works consistently across different grind sizes, because who hasn't been a little sleepy while grinding their morning beans?
- Origami Dripper A beautiful piece of coffee craft from Japan with those mesmerizing ridged walls. While it makes a lovely cup, the ceramic construction means it's basically a game of hot potato every morning. Flask's double-wall design keeps the heat where it belongs - in your coffee, not your fingers.
- Blue Bottle Dripper Sleek and simple with its stainless steel body. However, the steep sides can make it tricky to nail the pour technique - one wrong move and you're watching coffee overflow onto your counter. Flask's wider brewing chamber gives you more room for error while still ensuring perfect extraction every time.
How to drink pour over coffee
Let me share a secret that transformed my coffee journey - pour over coffee isn't just about the brewing, it's an experience waiting to be customized. After years of experimenting (and yes, some memorable mishaps), I've discovered countless ways to enjoy this incredible brewing method.
The Vessel Matters
First things first - let's talk about what you're drinking from. Your choice of cup can genuinely elevate your pour over experience:
- Double-walled glass: My personal favorite for black coffee. It keeps your brew at the perfect temperature while letting you admire those gorgeous caramel colors. Plus, there's something mesmerizing about watching the coffee swirl against clear glass.
- Ceramic mugs: Perfect for milk-based drinks. They retain heat beautifully and something about that warm ceramic against your hands just feels right on chilly mornings.
- Traditional coffee cups with saucers: When I'm feeling fancy or serving guests. The smaller size helps maintain the perfect temperature throughout your drink.
Making It Your Own
Now, let's dive into customization. Think of pour over coffee as your blank canvas:
The Classic Additions
- Milk or cream: Start with a small splash - pour over's clean profile means you need less than you think
- Alternative milks: Oat milk is my go-to. It has this natural sweetness that complements light roasts beautifully
- Sweeteners: Try honey or maple syrup instead of plain sugar. They add depth, not just sweetness
Getting Fancy
Here's where the fun begins! Try these elevated touches:
- Frothed milk art: Yes, you can create latte art with pour over! Heat your milk to 150°F and froth until silky. Pour slowly at a 45-degree angle for those Instagram-worthy designs.
- Spice infusions: A tiny pinch of cardamom or cinnamon in your grounds before brewing can create magic.
- Citrus accents: A small strip of orange peel adds brightness to darker roasts (I discovered this by accident and never looked back!)
Temperature Tips
The way you serve your pour over affects its flavor profile:
- Hot (185-190°F): Best for appreciating subtle flavor notes
- Warm (160-170°F): Perfect for milk-based drinks
- Room temperature: Great for detecting underlying sweetness
- Over ice: Brilliant for summer days (but brew it stronger initially)
Let me walk you through some of my absolute favorite pour over recipes. After years of experimenting (and yes, some memorable coffee mishaps), I've perfected these variations that'll make your morning brew feel like a cafe-quality experience.
Recipe 1: The Classic Pour Over Think of this as your coffee's little black dress - timeless and always perfect. Here's how I make mine:
- Grind 22g of your favorite single-origin beans to medium-fine consistency
- Use filtered water heated to exactly 200°F
- Pre-warm your favorite ceramic mug (trust me, it makes a difference!)
- Total brew time: 2:45-3:00 minutes
- Serve immediately while the aromatics are at their peak
The magic here is in the timing. I love watching the coffee's surface change as it cools, revealing layers of flavor you might miss if you drink it too quickly. Start with small sips and let each one linger - you'll notice the taste evolve from bright, fresh notes to deeper, more complex flavors.
Recipe 2: The Creamy Dream This is my weekend morning ritual, and it's pure comfort in a cup:
- Start with 25g of medium-dark roast beans
- Brew with 205°F water for a slightly bolder extraction
- While brewing, gently warm 2oz of whole milk to 150°F
- Add the warm milk in a slow, steady stream
- Finish with a drizzle of local wildflower honey (about 1/4 teaspoon)
- Serve in a clear glass mug to admire those beautiful caramel swirls
Pro tip: The milk should be warm but not hot - we're looking for that perfect harmony where the coffee and milk blend without either losing its character. I learned this the hard way after countless cups of accidentally scalded milk!
Recipe 3: The Weekend Special This is what I serve when I want to impress guests (or just treat myself):
- Use 30g of light roast beans for brighter flavors
- Brew with slightly cooler water (195°F) to preserve the delicate notes
- Steam 4oz of oat milk to create silky microfoam
- Pour the milk at a 45-degree angle for that barista-style layering
- Dust with raw cacao powder using a fine mesh sieve
- Serve in your favorite oversized mug
The key to perfect oat milk foam? Let the milk rest for 30 seconds after steaming - it develops this incredibly creamy texture that's even better than dairy.
Recipe 4: The Iced Perfection My go-to summer refresher that's leagues better than any cold brew:
- Start with 35g of coffee (adjust your grind slightly finer)
- Place 200g of ice in your carafe before brewing
- Use water just off boil (205°F) for proper extraction
- Brew directly over the ice in a slow, steady spiral
- Add 1oz of sweet cream (mix equal parts heavy cream and simple syrup)
- Serve over fresh, crystal-clear ice cubes
- Garnish with an orange peel for extra flair
Here's a game-changing tip: make ice cubes from filtered water or even cold coffee - it prevents dilution and keeps your drink perfectly balanced to the last sip.
Recipe 5: The Dessert Cup When coffee meets dessert, magic happens. This is my after-dinner showstopper:
- Begin with 25g of medium-dark roast beans
- Add 1/4 teaspoon of real vanilla bean paste to your cup before brewing
- Brew as normal with 200°F water
- Top with freshly whipped cream (whip it yourself - trust me!)
- Dust with a mixture of cinnamon and raw sugar
- Serve in your fanciest cup and saucer set
- Optional: add a chocolate-covered coffee bean garnish
The secret to making this truly special? Whip your cream by hand with just a touch of maple syrup instead of sugar. It creates this incredible depth that perfectly complements the coffee's natural sweetness.
Remember, these recipes are just starting points - feel free to adjust and experiment until you find your perfect cup. After all, the best thing about pour over coffee is how personal it can be!
Key takeaways on how to use a coffee pour over
After diving deep into the world of coffee brewing and how you can make the best coffee possible here are the essential points to remember:
- Temperature matters: Keep your water between 195-205°F for optimal extraction
- Timing is everything: The entire brew process should take 2.5-3 minutes
- Consistency is key: Use the same ratios and techniques until you find your perfect cup
- Quality counts: Fresh beans and filtered water make a huge difference
When comparing pour over vs French press or wondering what is drip coffee like, remember that pour over brewing offers unparalleled clarity and control.
The best pour over coffee maker is ultimately the one that fits your lifestyle while delivering consistently excellent results.
Looking at the bigger picture, pour over coffee isn't just about the brewing method - it's about taking a moment for yourself, paying attention to details, and crafting something special.
Whether you're new to the third wave coffee world and you find yourself asking what is speciality coffee all about, or a seasoned pour-over enthusiast, each cup is an opportunity to perfect your craft and discover new flavors in your daily ritual.
Remember, whether you're debating pour over vs drip coffee or just starting your brewing journey, great coffee is all about discovery, not reaching some mythical destination. After all, the best cup of coffee is the one made exactly how you like it.